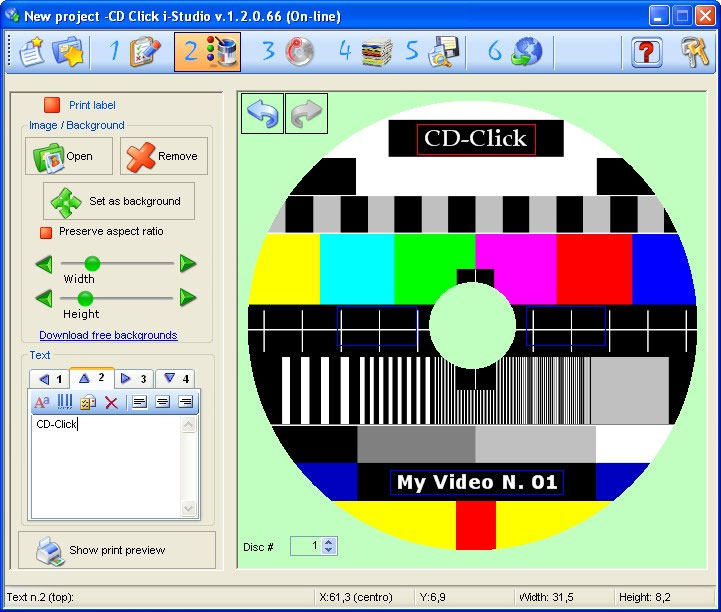
To start creating the disc label of your project, please "check" the "Print Label" button
First of all, you have to import the graphic file that you created or the photograph you want to print on the disc.
Click on the  button to import the graphic file. Allowed files have the .bmp .gif .jpg .jpeg .png .ico .emf e .wmf. extension.
Once the image is placed on the disc template, the user can drag the image freely over the entire surface of the disc using the mouse.
If necessary, use the buttons "UNDO" or "REDO" 
You can also resize the image by dragging the corners of the image.
Click on the  button to automatically adjust the size of the image so that it is spread across the entire printable area of the disc.
Click on the  button if you wish to lock the aspect ratio (height over width). This function ensures that the image won't stretch when the user resizes it.
The user can drag the Height and Width sliders to adjust the size of the image or else the user can utilize the 
 keys to adjust the size of the image.
It is recommended not to enlarge a small image too much, or shrink a large image too much to preserve the quality of the image. It it also recommended to use an adequate printing resolution (min 300 dpi higher is better).
Click on the  button to check the print resolution. Enlarge the preview to 200% or higher to make sure the image or the text on the label are crispy and do not smear.
WARNING : The print preview you'll see on screen may not match perfectly what you will see on your disc in terms of color rendering. This discrepancy may be caused by several factors such as your monitor color settings, the type of media, the printer driver parameters etc.
TEXT AND SERIALIZATION
CD Click i-Studio label editor allows the user to add up to 4 text boxes each with its own font, size and text color. This function comes in handy especially when you wish to print different text strings for each disc ( merge image and text ) or self-increasing serial numbers .
Initially the text boxes are placed at the 4 corners of the disc. However the user can position the four text boxes anywhere inside the disc shape by dragging and dropping the text boxes around the disc shape.
Click any of the arrow keys in the window (left:  up:
up: right:
 down:
down: ) to select a text box and enter text in it.
When you click on a text box its frame gets highlighted in red.
Each text box features a toolbar with the following keys:
 Font selection, size and font color .
 Enter a self-increasing serial number .
 Enter a merge image and text field.
 Delete the text and place the text box back in its default position.
 Align the text - left, center or right.
The user can access this menu also by either right-clicking any of the four text-entering fields or by clicking directly any of the four text boxes on the label .
If you choose to print a serial number or a merge image and text field the system allows you to preview any of the print copies merely by selecting the progressive order number in the following box: 
The variable portion of the text - 'merge image and text' fields and serial numbers - are symbolized inside each text-entering field by coded strings shown between '<' and '>' keys. It is recommended not to edit these strings directly. Use the keys on the toolbar to edit them.
Click on the button to check the print resolution. Enlarge the preview to 200% or higher to make sure the image or the text on the label are crispy and do not smear.
WARNING : The print preview you'll see on screen may not match perfectly what you will see on your disc in terms of color rendering. This discrepancy may be caused by several factors such as your monitor color settings, the type of media, the printer driver parameters etc.
Click on the  button to open the "Create the disc content" menu.


 Download CDClick i-Studio
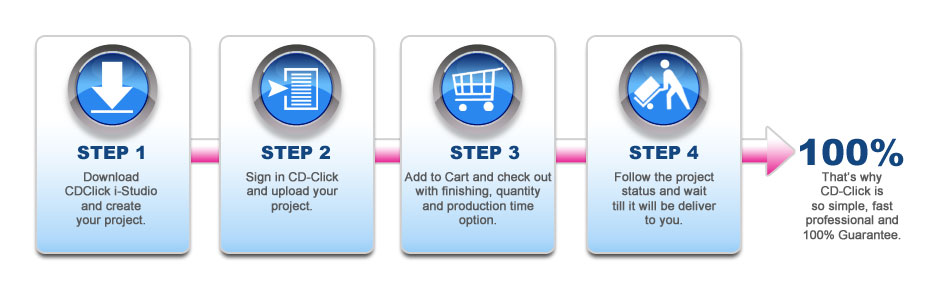